The RLN8-410 and RLN16-410 are Reolink’s 8-channel and 16-channel PoE NVRs, built for 24/7 recording from Reolink’s own PoE camera lineup without needing a subscription. The two share the same core design, differing mainly in channel count and internal storage capacity.
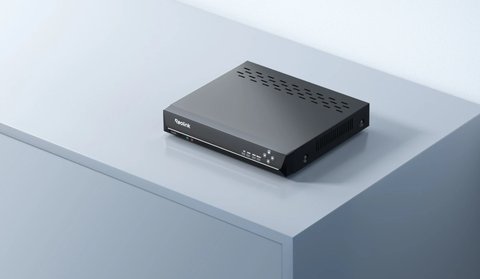
RLN8-410 vs RLN16-410: Key Specs
| Category | RLN8-410 | RLN16-410 |
|---|---|---|
| PoE ports | 8 | 16 |
| Max cameras supported | Up to 12 (8 PoE/plug-in Wi-Fi plus 4 battery Wi-Fi, or 12 battery Wi-Fi) | Up to 24 (16 PoE/plug-in Wi-Fi plus 8 battery Wi-Fi, or 24 battery Wi-Fi) |
| Internal storage | Internal HDD slot plus eSATA, expandable up to 16TB | 2 internal HDD slots (newer UI models) |
| Supported camera resolution | Up to 16MP/12MP/4K/8MP/5MP/4MP Reolink PoE cameras | Same supported resolution range |
| Power consumption (without HDD/PoE draw) | Under 10W | Under 10W |
| Operating temperature | -10°C to +45°C | -10°C to +45°C |
Which One to Choose
- The RLN8-410 fits most residential setups covering a house and yard with room to grow to around a dozen cameras
- The RLN16-410 makes more sense for larger properties, small businesses, or anyone planning to scale well beyond eight cameras
- Both use the same PoE-based approach, meaning a single Ethernet cable per camera handles both power and data

Buying more channels than you currently need isn’t wasted money if you expect to expand — going from an 8-channel to a 16-channel NVR later means buying an entirely new unit, while starting with headroom avoids that upgrade cost down the line.
Basic Setup Overview
- Install a compatible hard drive in the internal HDD bay if one isn’t pre-installed
- Connect PoE cameras directly to the NVR’s Ethernet ports
- Format the drive through the NVR’s on-screen menu or the Reolink app before recording begins
- Add the NVR to your Reolink account and configure recording schedules per channel
A More Detailed Walkthrough of First-Time Setup
The four-step overview above covers the basics, but a few details make the difference between a smooth first boot and an afternoon of troubleshooting. Here’s what each stage actually involves in practice.
Physical installation. Both the RLN8-410 and RLN16-410 use a standard 3.5-inch SATA drive bay accessed by removing the top cover, usually held on by four to six small screws. Surveillance-rated drives — Western Digital Purple or Seagate SkyHawk are the common recommendations — are worth the small price premium over a standard desktop drive, since they’re built for the continuous read/write cycles that 24/7 NVR recording puts on a drive. Once seated in the bay and connected via the internal SATA and power cables, close the cover before powering the unit on.
Network configuration. On first boot, the NVR runs a short setup wizard covering the admin password, time zone, and network mode. Leaving the NVR on DHCP is fine for most home networks, but if you plan to access it locally by a fixed address later, assigning a static IP through your router’s DHCP reservation list avoids the NVR’s address changing after a power outage or router reboot.
Camera connection and channel mapping. Each PoE port corresponds to a fixed channel number, so it’s worth planning which camera goes into which port before running cables, particularly if you want channel 1 on the display to correspond to your front door camera rather than whichever port happened to be free. Cameras connected directly to the PoE ports are powered and configured automatically without a separate injector or switch, which is one of the real conveniences of a PoE-based system over standalone Wi-Fi cameras.
- Drive formatting: Do this through the NVR’s own storage menu, not by pre-formatting the drive in a PC beforehand
- Recording mode: Choose continuous, motion-triggered, or scheduled recording per channel depending on how much storage you want to use
- Overwrite behavior: Decide whether old footage should be automatically overwritten once the drive fills, which is usually the sensible default for a “set and forget” system
Understanding PoE Power Budget
One detail that catches new buyers off guard is that each PoE NVR has a total power budget shared across all its ports, not just a per-port maximum. If you plan to add several higher-draw cameras — pan-tilt-zoom models or cameras with built-in floodlights and sirens tend to pull noticeably more power than a basic fixed-lens bullet camera — it’s worth checking the NVR’s total PoE power budget against the combined draw of everything you intend to connect, rather than assuming each port can always deliver its rated maximum simultaneously. Reolink’s official specification pages list the total budget for each model, and it’s a five-minute check that avoids cameras browning out or failing to power on once you’ve filled most of the available ports.
Setting Up Remote Viewing and Notifications
Once the NVR is recording locally, the Reolink app handles remote viewing over your phone’s mobile data or another Wi-Fi network. Adding the NVR to your account typically involves scanning a QR code shown on the NVR’s own display or entering its unique device ID manually, after which live feeds and playback become accessible from anywhere with an internet connection, without any router port-forwarding required.
- Open the Reolink app and choose to add a new device, selecting the NVR rather than an individual camera
- Scan the QR code on the NVR’s local display, or type in the device ID printed on a label on the unit itself
- Set individual notification preferences per channel, since you likely don’t want a push alert for every parked-car pass on a driveway camera the same way you would for a front-door camera
- Add additional family members as secondary users if more than one person needs remote access, with the option to limit their permissions to view-only
Push notifications rely on the NVR staying connected to the internet continuously, so a flaky home internet connection will show up as gaps in your notification history even if local recording never actually stopped — worth knowing before assuming a missed alert means a camera failure.
Common Setup Problems and Fixes
- Problem: The NVR doesn’t detect a newly installed hard drive. Power off completely, reseat both the SATA data and power cables inside the case, and confirm the drive is on Reolink’s compatibility list before assuming the drive itself is faulty.
- Problem: A connected PoE camera shows as offline on one channel. Try swapping the camera to a different PoE port to isolate whether the port or the camera is at fault, and check that you haven’t exceeded the NVR’s total PoE power budget with everything currently connected.
- Problem: Remote viewing works locally but not away from home. Confirm the NVR still has an active internet connection (not just a local network connection), since P2P remote access depends on that, and check whether your ISP’s connection has dropped or your router has rebooted recently.
- Problem: Recording stops even though the drive isn’t full. Check the recording schedule configuration first, since an accidentally disabled schedule on a specific channel is a far more common cause than drive failure, then check drive health through the NVR’s storage menu.
- Problem: Push notifications stop arriving despite the app showing the NVR as online. Toggle notification permissions off and back on for the app on your phone, and re-check per-channel alert settings, since a firmware update occasionally resets these to a different default.
- Problem: The NVR’s admin password has been forgotten. Most models support a security-question-based recovery in the login screen; if that isn’t set up, a physical reset restores factory defaults, after which every camera and setting needs to be reconfigured from scratch.
For full specifications, see Reolink’s official RLN8-410 product page and the Introduction to Reolink RLN8-410 and RLN16-410 support article.
Frequently Asked Questions
Do these NVRs require a subscription?
No, local recording to the internal hard drive works without any subscription; cloud storage is an optional paid add-on.
Can I add a hard drive myself?
Yes, both models support user-installed internal hard drives if one wasn’t included, following Reolink’s drive compatibility guidelines.
Can these NVRs work with Wi-Fi cameras, not just PoE?
Yes, both support a mix of PoE and battery-powered Wi-Fi cameras up to their respective maximum camera counts.
What happens if I exceed the maximum camera count?
The NVR won’t add additional cameras beyond its supported limit; you’d need to upgrade to a higher-channel model or add a second NVR.
Conclusion
The RLN8-410 and RLN16-410 share the same core PoE NVR design, and the right choice mainly comes down to how many cameras you need now and expect to add later. Since upgrading channel count later means buying a new unit entirely, it’s worth erring toward the larger option if expansion is even a possibility.
Ryan
CS graduate · 20+ years testing PC hardware and smart home apps