The Reolink B10 is a junction box, not a camera itself — it’s an aluminum alloy mounting enclosure designed to hide and protect the cable connections behind compatible bullet cameras like the B400, RLC-810A, and several other PoE bullet models. Here’s what it actually does and when it’s worth adding.
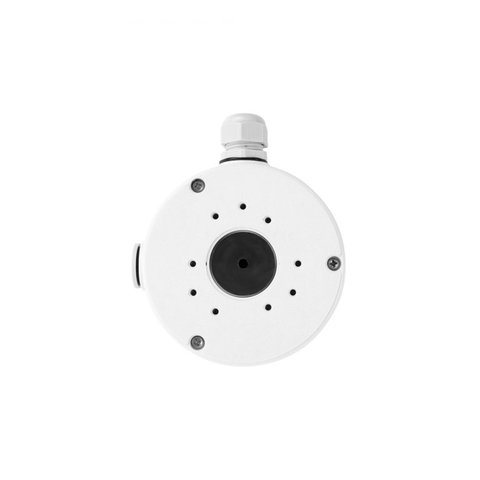
| Type | Cable junction / mounting enclosure, not a camera |
| Material | Aluminum alloy |
| Weatherproofing | IP66 |
| Compatible cameras | B400, RLC-510A/510WA/810A/811A/811WA/81MA/81PA/1210A, Duo 2 PoE/WiFi, CX410 |
| Mounting | Wall-mounted, threaded connection point for the camera |
| Tools needed | Drill, screwdriver, basic wall anchors |
What the B10 Actually Does
- Houses the Ethernet cable connection point behind a bullet camera, keeping it out of sight and protected from weather
- Rated IP66, so the connection stays sealed against dust and heavy rain
- Provides a cleaner, more finished look than a cable running visibly along the wall to the camera
- Made from aluminum alloy rather than plastic, holding up better to outdoor exposure over time
Which Cameras It’s Compatible With
The B10 is designed specifically for Reolink’s bullet-style cameras, including the B400, RLC-510A, RLC-510WA, RLC-810A, RLC-811A, RLC-811WA, RLC-81MA, RLC-81PA, RLC-1210A, Duo 2 PoE, Duo 2 WiFi, and CX410. It’s not a universal fit for every Reolink camera shape, so check your exact model against Reolink’s compatibility list before ordering.
Most of these are PoE bullet models, meaning a single Ethernet cable handles both power and data, which is exactly the kind of single-cable connection the B10 is built to hide. The WiFi variants in the list, like the Duo 2 WiFi, still route a power cable through the junction box even without a data-carrying Ethernet run, so the B10 is useful for either connection type as long as the camera body itself is on the compatibility list. If your camera uses a proprietary 4-pin or 6-pin connector instead of a standard RJ45 Ethernet plug, double-check Reolink’s own documentation before assuming a universal fit, since some older bullet models use a different connector standard that will not seat properly inside the B10’s cable entry point.
Mounting Surfaces and Wiring Considerations
The B10 mounts the same way regardless of camera model, but the wall surface behind it changes what hardware you actually need. On brick or stucco, you will want masonry anchors rather than the standard drywall anchors sometimes included in the box, since a plastic anchor sized for drywall will simply spin in a masonry hole rather than gripping. Vinyl siding is trickier still: mounting directly through vinyl without a mounting block behind it can crack the siding over time as it expands and contracts with temperature, so a small block or backer plate rated for exterior camera mounts is worth the extra few dollars.
- For brick or concrete: use masonry screws or anchors rated for outdoor exterior mounting
- For vinyl siding: mount through a siding block rather than directly into the panel
- For wood siding or fascia: standard wood screws are usually sufficient without additional anchors
- For stucco: pre-drilling with a masonry bit before inserting anchors prevents cracking around the mounting holes
Cable routing matters just as much as the wall material. If you are running a new Ethernet cable from inside the house, planning the entry point before mounting the B10 saves a lot of frustration, since moving a drilled hole after the fact usually means patching and redrilling. Leaving a small service loop of extra cable inside the junction box, rather than pulling it perfectly taut, also makes it easier to detach the camera for cleaning or replacement later without disconnecting the cable entirely.

The B10 is easy to overlook since it’s not a headline feature of any camera, but it solves a real annoyance — a loose junction connector sitting exposed behind a bullet camera is one of the more common weak points for water intrusion over time, and the B10 is a cheap, purpose-built fix for that.
Installing a Camera With the B10
- Pick the mounting spot and confirm the cable entry point lines up with where your Ethernet or power cable actually exits the wall, rather than assuming it will reach comfortably
- Mount the B10 to the wall first, routing the cable through its sealed cable entry point before securing the box fully
- Connect the camera’s cable to the Ethernet run inside the junction box, leaving a small service loop of slack rather than pulling it taut
- Mount the compatible bullet camera directly onto the B10’s threaded connection point, hand-tightening first before using a screwdriver to snug it down
- Seal any remaining gaps as directed in the included instructions to maintain the IP66 rating, paying particular attention to the seam where the camera base meets the junction box
- Power on the camera and confirm a stable connection in the Reolink app before considering the installation finished, since it’s much easier to fix a wiring issue now than after the mount is fully weatherproofed
I installed a B10 with an RLC-810A on a stucco wall last spring, and the part that actually took the longest wasn’t the mounting itself, it was routing the Ethernet cable cleanly through the wall before attaching the box. Once the cable was in place, connecting the camera and sealing the unit took maybe ten minutes total. If you’re retrofitting an existing camera that was previously mounted without a junction box, expect the whole job to take under an hour for one camera, longer if you’re running new cable through an exterior wall for the first time.
For full compatibility details and installation instructions, see Reolink’s official How to Install a Reolink Camera with Junction Box B10/D20 support article.
When the B10 Is Actually Worth Adding
Not every installation needs one. A few scenarios where it genuinely earns its cost:
- Retrofitting an older installation: if you have a bullet camera whose cable connector has been sitting exposed behind the housing for a while, adding a B10 during a re-mount is a cheap way to fix a known weak point before it causes a failure.
- Humid or coastal climates: salt air and consistent humidity accelerate corrosion at exposed connectors far faster than a dry inland climate, making the sealed junction box a more worthwhile investment.
- New construction or a planned camera system: if you’re wiring a house for several cameras from scratch, mounting each bullet camera on a B10 from day one avoids ever having to retrofit later.
- Exposed mounting locations: a camera mounted under an open eave with no overhang protection benefits more from the B10’s sealed connection than one already tucked under generous roof coverage.
On the other hand, if your camera is already mounted somewhere well protected from direct rain, and the connector has held up fine for a year or more, there’s no urgent need to retrofit a B10 just for the sake of it. It’s a preventative accessory, not a fix for a camera that’s already having connection problems unrelated to moisture.
Troubleshooting Common Problems
- Water still finds its way into the box: this almost always traces back to the seal where the camera base meets the B10, not the box itself; recheck that gasket is seated evenly and that no cable is pinched in a way that leaves a gap.
- The Ethernet cable is too short to reach the junction box: rather than stretching a cable under tension, which stresses the connector over time, use a coupler to extend it or run a properly sized replacement cable to the new mounting point.
- The camera’s threaded base doesn’t line up cleanly with the B10’s mount: double check your exact camera model against Reolink’s compatibility list, since a close-but-not-listed model can look like it fits while leaving a slight gap that undermines the seal.
- Corrosion appears at the connector after a year or more outdoors: this is more common in coastal or high-humidity climates; a light application of dielectric grease on the connector before sealing the box helps resist this on future re-installs.
- Condensation builds up inside the box despite a proper seal: this typically happens with large temperature swings between day and night; it’s usually harmless if the connector stays dry, but confirm the box’s drainage point, if your specific model has one, isn’t blocked by debris.
Frequently Asked Questions
Does the B10 work with dome or pan-tilt cameras?
No, it’s specifically designed for compatible bullet-style cameras, not dome or pan-tilt models.
Is the B10 required for outdoor installation?
No, it’s optional; many bullet cameras can be mounted directly without it, but the B10 improves weatherproofing and appearance at the connection point.
Can I use the B10 with a non-Reolink camera?
It’s built to match the mounting dimensions of specific Reolink bullet models, so compatibility with other brands isn’t guaranteed.
Does installing the B10 require any tools?
Yes, basic tools like a drill and screwdriver are needed for wall mounting, similar to installing the camera itself.
Conclusion
The B10 is a small, inexpensive accessory that solves a real weak point in bullet camera installations — exposed cable connections. If your camera model is on its compatibility list and you want a cleaner, more weatherproof mounting point, it’s worth the modest added cost.
Ryan T. is a PC hardware enthusiast with 15+ years of experience fixing drivers and testing consumer tech. He writes for softwaredriverdownload.com.