Getting a Dymo LabelManager working with your Windows PC requires the DYMO Connect software package, which includes the printer driver, and this guide covers the download, installation, and the fixes for the connection problems people run into most often.
The LabelManager series covers several handheld models, from the entry-level LabelManager 160 to the wireless LabelManager Wireless PnP, and thankfully they all share the same underlying installation process on Windows. I have set these up for home organizing projects and small office label runs, and the steps below reflect what actually works.
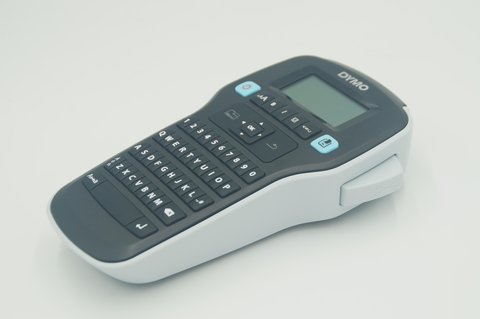
Author/Publisher: Newell Brands / DYMO
Driver/Software Date: Current release on DYMO’s official download page
Version: DYMO Connect for Desktop, latest build
File Name: DYMOConnectSetup.exe
File Size: Approximately 180 MB
OS Compatibility: Windows 10, Windows 11 (32-bit and 64-bit)
Downloading and Installing DYMO Connect
Visit the official DYMO support page and download DYMO Connect for Desktop, which bundles the driver with the label design software. Some older LabelManager models like the 160 do not even need a PC connection for basic labeling since they have a built-in keypad, but connecting to DYMO Connect unlocks templates, barcodes, and saved label files.
- Run the downloaded installer as administrator.
- Accept the license agreement and choose the default install location.
- Leave the LabelManager unplugged until the installer prompts you to connect it.
- Connect the USB cable when instructed, and wait for the driver installation to finish automatically.
- Launch DYMO Connect and confirm the device appears in the printer selection dropdown.
Common Causes of Failure
- Installing DYMO Connect while an older CardStock or DYMO Label software version is still present
- Connecting the LabelManager before the installer requests it
- Using a damaged or charge-only USB cable
- Outdated Windows USB controller drivers
- Antivirus software blocking the driver signing check mid-install
Matching Fixes
- Uninstall old DYMO software fully via Control Panel before reinstalling
- Restart the install and follow connection prompts in order
- Swap in the original DYMO USB cable
- Run Windows Update to refresh chipset and USB drivers
- Temporarily disable real-time antivirus scanning during install
Troubleshooting Steps in Detail
If DYMO Connect launches but does not detect the LabelManager, this is the sequence I run through every time:
- Confirm the LabelManager is powered on, since some models auto-sleep after inactivity and need a button press to wake up before Windows detects them.
- Open Device Manager and check for the device under “Printers” or “Other devices” with a warning icon.
- Uninstall the flagged device entry, unplug the LabelManager, restart the PC, then reconnect.
- Reinstall DYMO Connect from a fresh download if the software itself seems corrupted.
- Test the USB cable and port with a different device to rule out a hardware fault unrelated to DYMO.
On one project, a LabelManager 280 kept disconnecting mid-print, and it turned out to be a worn USB port on the laptop itself, confirmed by testing the same cable and device on a different machine without issue.
Per Carlos Fernandez, who is a Warehouse Supervisor at a logistics company, “We label hundreds of bins a week with our LabelManager units, and the driver install almost always goes smoothly if staff just wait for the software to tell them when to plug in the cable instead of doing it right away.”
Manual Driver Install Through Device Manager
- Open Device Manager from the Start menu search or Windows key + X.
- Locate the LabelManager entry, usually under “Other devices” if the driver failed automatically.
- Right-click and select “Update driver,” then “Browse my computer for drivers.”
- Point to the DYMO Connect installation folder, typically under Program Files (x86)\DYMO.
- Confirm the install and restart your PC to finalize it.
Windows 10 and Windows 11 Notes
DYMO Connect installs and runs the same way across both versions of Windows. The main difference is where you go to check driver status: Windows 11 moves printer and device settings into a redesigned Settings app, while Windows 10 keeps more of it in the classic Control Panel and Device Manager. Either path gets you to the same driver information, just through a different menu layout. Microsoft documents these interface differences on their official support site.
Frequently Asked Questions
Does every DYMO LabelManager model need DYMO Connect installed?
Not strictly. Basic models like the LabelManager 160 can print standalone labels using their built-in keypad without ever touching a computer. DYMO Connect is only required if you want to design labels on your PC, use templates, or print barcodes.
Why does DYMO Connect not detect my LabelManager after installing?
This is almost always a connection timing issue or a leftover conflicting driver from an older DYMO software version. Uninstall any old DYMO programs completely, restart your PC, then reinstall DYMO Connect fresh.
Can I use DYMO Connect with a wireless LabelManager model?
Yes, wireless models like the LabelManager Wireless PnP pair over Bluetooth after the initial DYMO Connect installation, though the first setup step still typically requires a USB connection to register the device.
What should I do if the printed labels come out blank?
Check that the label cassette is inserted correctly and that you are using genuine DYMO label tape, since third-party tape sometimes lacks the correct sensor markings the device relies on to detect label length.
Is there a separate driver needed for 64-bit versus 32-bit Windows?
No, the DYMO Connect installer automatically detects your system architecture and installs the matching driver components, so you do not need to choose manually.
Keeping the LabelManager Reliable Long Term
Once the driver and software are working, a little routine care keeps the LabelManager printing cleanly for years. Wipe the print head area gently with a dry, lint-free cloth every few months to clear dust and tape residue, since buildup here is a common cause of faded or streaky labels that people mistake for a driver problem. Store spare label cassettes in a cool, dry place, and avoid leaving the device plugged in and idle for extended periods on models with rechargeable batteries, as this can shorten battery lifespan over time.
It is also worth checking for DYMO Connect software updates every couple of months. Newell Brands pushes out periodic updates that patch Windows compatibility issues before they become widespread problems, so staying current saves you from chasing a driver issue that a five-minute update would have already fixed.
Conclusion
Installing the DYMO LabelManager driver is straightforward as long as you let DYMO Connect guide the connection order and remove any leftover older DYMO software first. When detection issues do come up, Device Manager and a clean cable swap resolve nearly all of them based on what I have seen supporting these devices.
Ryan has a Computer Science background and more than 20 years of practical experience troubleshooting printers, label makers, and PC peripherals for everyday users. Find more driver guides at SoftwareDriverDownload.com.