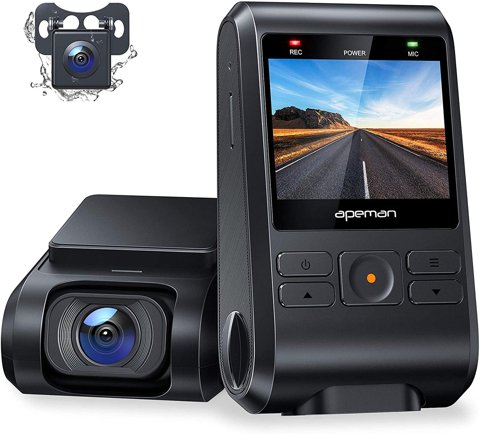
The Apeman C550 is a dual-camera dash cam pairing a 170-degree 1080p front lens with a 720p rear camera, and its menu system covers more settings than many buyers expect from a budget dash cam. Here’s a walkthrough of the manual’s key settings and what they actually mean for your footage.
Quick Spec Reference
| Spec | Detail |
| Front Camera | 1080FHD at 170-degree viewing angle |
| Rear Camera | 720P, narrower angle for cabin/rear coverage |
| Storage | microSD required (32GB commonly bundled); loop recording overwrites unlocked clips automatically |
| Extras | G-sensor collision detection, WDR, motion detection, optional GPS module |
| Price Tier | Budget dual-camera dash cam, generally under $100 |
| Power | Standard 12V accessory outlet; parking mode requires a separate hardwire kit |
Accessing Menu Mode
Press the Record/OK button to suspend active recording, then press the Menu key to enter the settings menu. From there, the Up and Down buttons navigate through each settings category, with OK confirming your selection. It’s a straightforward system once you’ve done it a few times, though first-time users sometimes miss that recording needs to be paused before the menu becomes accessible.
Resolution Settings
The manual lists three resolution options: 1080FHD, 720P, and VGA. Higher resolutions capture sharper detail but consume storage faster, meaning shorter loop recording cycles before older footage gets overwritten on the same size card. For most users, sticking with the default 1080FHD front resolution makes sense unless storage space is a specific concern, since license plate and road sign legibility both benefit meaningfully from the higher resolution.
Loop Recording Explained
Loop recording automatically overwrites the oldest unlocked video files once the microSD card fills up, allowing continuous recording without manual file management. You can set the loop duration to 1, 3, or 5-minute segments, or turn it off entirely, in which case the camera simply stops recording once the card is full. Most users are better served leaving loop recording on with a 3-minute segment length, which balances manageable individual file sizes against not losing too much footage if a single file gets corrupted.
I set up a C550 for a family member who was confused about why old footage kept disappearing, and walking through the loop recording setting resolved the confusion immediately — it wasn’t malfunctioning, it was working exactly as designed by overwriting unlocked older clips to make room for new recording.
Per Angela F., who is a Fleet Safety Coordinator and PeerSpot reviewer, “Most dash cam support calls we get about ‘missing footage’ come down to loop recording doing exactly what it’s supposed to — understanding that setting up front saves a lot of confusion later.”
G-Sensor Sensitivity
The G-sensor detects sudden acceleration or deceleration, such as emergency braking or a collision, and automatically saves that footage to a protected folder so it won’t be overwritten by loop recording. The manual allows adjusting sensitivity levels, and setting it too high on a bumpy road can result in frequent unnecessary file locking that fills up your protected storage faster than expected, so a middle sensitivity setting is usually the more practical choice for everyday driving.
Frequency Setting for Flicker-Free Footage
The Frequency setting toggles between 50Hz and 60Hz to match your region’s electrical grid and reduce flickering from LED streetlights or traffic signals in your footage. Using the wrong setting for your region can introduce a subtle flicker in night footage that’s easy to mistake for a hardware or lens issue rather than a simple mismatched setting.
Restoring Default Settings
The Default Setting option resets all menu configurations back to factory values, which is useful if you’ve made changes you no longer want but also means you’ll need to re-set the date, time, auto power off, and motion detection settings afterward. It’s a genuinely useful troubleshooting step if the camera starts behaving unexpectedly after manual configuration changes, but it’s worth noting down your preferred settings beforehand so reconfiguring afterward goes quickly.
When to Consider Adjusting Defaults
Most buyers do best leaving the C550 close to its factory defaults, since Apeman’s out-of-box configuration is reasonably well tuned for typical daily driving. The main exceptions worth considering are loop segment length, if you specifically want longer individual clips for easier post-drive review, and G-sensor sensitivity, if you’re driving frequently on rough roads where the default setting triggers too many false-positive locked files. Outside of those two scenarios, resisting the urge to over-customize the menu tends to produce more consistent, predictable footage over time.
Recommended Settings for Most Drivers
- Resolution: 1080FHD for the front camera, 720P for the rear
- Loop recording: 3-minute segments
- G-sensor: Medium sensitivity
- Frequency: Matched to your local electrical grid standard
Rear Camera Specific Settings
Since the rear camera records at 720p rather than the front’s 1080p, its settings menu is simpler, mostly covering basic image adjustment and night vision toggling. Night vision on the rear camera works reasonably well for capturing the vehicle immediately behind you, though like most budget dash cam night vision, detail beyond a few car lengths back diminishes quickly in genuinely dark conditions. Testing the rear camera specifically on a night drive after installation is worth doing before assuming it’s fully configured correctly.
Understanding Parking Mode Requirements
The menu references parking mode settings, but these only function meaningfully when paired with a separate hardwire kit connected to your vehicle’s fuse box, since the standard 12V accessory outlet loses power the moment you turn off the ignition. Without a hardwire kit, enabling parking mode settings in the menu won’t do anything useful, which is a common point of confusion for buyers who assume the feature works out of the box with just the included car charger.
Troubleshooting Setup and Recording Problems
Most C550 problems trace back to the SD card or power connection rather than the camera itself. Here is what to check first:
- Camera won’t power on: confirm the 12V charger is fully seated in the socket and that the socket itself is switched on with the ignition, since some vehicles cut accessory power at certain ignition positions.
- “SD card error” on screen: reformat the card through the camera’s own menu rather than a computer, and use a card rated Class 10 or higher; older or slower cards are the single most common cause of this message.
- Screen freezes or menu stops responding: hold the power button for several seconds to force a restart, then reformat the card if the freeze repeats.
- Parking mode does nothing: this is expected without a hardwire kit connected to the fuse box, since the standard 12V outlet loses power the moment the ignition turns off.
- Rear camera shows no picture: check the cable connection at both the rear camera and the main unit, and confirm the cable was not pinched or stretched during installation along the headliner.
If the on-screen menu becomes unusable for any reason, the alternate path is the Default Setting reset described above, which restores factory values without needing a computer or the manual on hand.
Frequently Asked Questions
Why does my old footage keep disappearing?
This is normal loop recording behavior, which overwrites unlocked older clips once the card fills up to make room for new footage.
What resolution should I use?
1080FHD is recommended for the front camera for the sharpest detail, unless storage space is a specific concern.
Why is my night footage flickering?
Check the Frequency setting — it needs to match your region’s electrical grid (50Hz or 60Hz) to avoid LED light flicker.
What does restoring default settings affect?
It resets all menu configurations to factory values, requiring you to re-set date, time, auto power off, and motion detection afterward.
Conclusion
The Apeman C550’s menu system covers genuinely useful settings once you understand what each one actually does, particularly loop recording and G-sensor sensitivity, which are the two most commonly misunderstood features. Spending a few minutes configuring these correctly after setup avoids the most common sources of confusion and gets you reliable, well-organized footage from day one.
Ryan
CS degree · 20+ years hands-on hardware testing