You can get the M-Audio AIR 192|4 driver straight from the M-Audio support downloads page — pick your Windows version, install the AIR Series driver package, then reboot before you open your recording software. Below I will walk through the full setup, the common problems people run into, and how to fix each one.
| Spec | Detail |
|---|---|
| Applies To | M-Audio AIR 192|4 USB-C audio interface (2-in/2-out) |
| Publisher | InMusic / M-Audio |
| Driver Type | AIR Series ASIO/WDM class driver package |
| File Name | AIR-Series-Driver-Setup.exe (Windows), signed .pkg (macOS) |
| File Size | Roughly 25–40 MB depending on version |
| OS Compatibility | Windows 10 64-bit, Windows 11, macOS (Intel and Apple Silicon) |
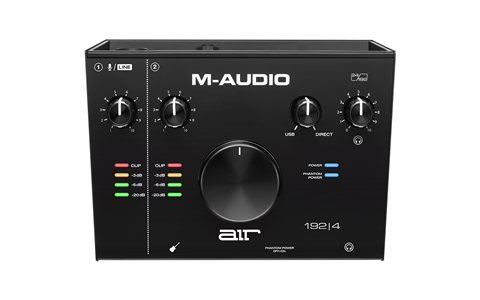
The AIR 192|4 is M-Audio’s small desktop audio interface built for podcasters, singers, and home guitarists who want a clean signal into their computer without a big mixing desk. It has two combo XLR/quarter-inch inputs, Crystal preamps, and a direct monitoring knob so you can hear yourself with almost no delay. I have set one of these up for a friend who records voiceover work from a spare bedroom, and the whole process from unboxing to a working recording in his DAW took under fifteen minutes once the driver was installed correctly.
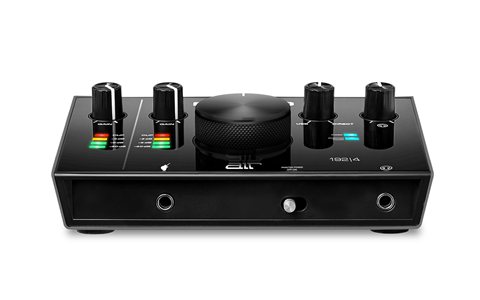
Downloading and Installing the AIR 192|4 Driver
Windows will usually detect the AIR 192|4 as a generic USB audio device the moment you plug it in, but for the lowest latency and full control panel you need the real AIR Series driver, not the generic Windows class driver.
- Go to the M-Audio downloads page and search for “AIR 192|4”.
- Download the AIR Series driver installer that matches your Windows build (32-bit is no longer offered on recent packages).
- Close your DAW and any browser tabs using your microphone before running the installer.
- Run the .exe as administrator, accept the driver signing prompt, then restart your PC even if Windows says it is optional.
- Plug the interface back in after the restart and confirm it in Device Manager under “Sound, video and game controllers”.
After install, open the AIR Control Panel to set your sample rate (44.1kHz or 48kHz for most recording, 96kHz only if your project actually needs it) and buffer size. A buffer of 128 or 256 samples is a good starting point — lower values reduce latency but can cause crackling on slower machines.
Fixing Common AIR 192|4 Problems
No Sound or Interface Not Detected
This almost always comes down to one of three causes: a USB port that does not supply enough power, the wrong device selected as the default in Windows, or a driver that failed to load after a Windows update.
- Try a different USB port — use a rear motherboard port on desktops instead of a front-panel hub.
- Open Windows Sound settings and manually set the AIR 192|4 as your default input and output device.
- Open Device Manager, right-click the interface, choose “Update driver”, then “Uninstall device” and reboot to force a clean reinstall if updating does not help. See Microsoft’s official guide on updating drivers manually for the exact steps.
- Avoid USB hubs entirely if you can — the AIR 192|4 draws its power from the USB bus, and a cheap hub can starve it.
Crackling, Popping, or Dropouts
I ran into this exact issue on a Windows 11 laptop with power-saving USB settings enabled — the interface kept cutting out every few seconds during a recording session. Going into Device Manager, opening the USB Root Hub properties, and unchecking “Allow the computer to turn off this device to save power” fixed it immediately. If that does not solve it, raise your buffer size in the AIR Control Panel and disable Wi-Fi or Bluetooth radios while recording, since they compete for the same USB controller resources on many laptops.
Interface Works But Shows Up Twice
Duplicate entries in Device Manager usually mean an older generic driver never got removed before the real AIR Series driver was installed. Uninstall both entries, tick “Delete the driver software for this device” on each, unplug the interface, restart, then plug it back in so Windows can do a clean install.
Manual Install When the Setup File Fails
If the installer itself errors out (common on locked-down work laptops or after a botched Windows update), you can still get the interface running with a manual point-and-install:
- Extract the driver package with 7-Zip instead of running the .exe directly.
- Open Device Manager, find the AIR 192|4 under “Other devices” or “Sound controllers”.
- Right-click it, choose “Update driver”, then “Browse my computer for drivers”, and point Windows to the extracted folder.
- Let Windows install the matching .inf file, then restart.
This fallback works because the driver package is really just a signed .inf plus supporting files — the installer is only a convenience wrapper. If Device Manager still refuses the driver, check that Secure Boot has not blocked an unsigned test build; stick with the official signed release from M-Audio’s site.
Per Daniel R., a home studio owner on G2, “The AIR 192|4 punches above its price for a beginner interface — low latency, decent preamps, and the driver has been rock solid once I set it up properly.”
Getting the Best Recording Levels
Once the driver is stable, spend a minute setting gain properly instead of leaving it on default:
- Turn phantom power on only if you are using a condenser microphone — leave it off for dynamic mics and instruments.
- Set gain so your loudest peaks sit around -6dB on the clip meter, never in the red.
- Use the Direct/USB blend knob to mix your live input with your computer’s playback for zero-latency monitoring while recording.
- Check that your DAW’s input is set to the AIR 192|4, not your laptop’s built-in microphone — this is the single most common reason people think the interface “does not work” when it actually just is not selected.
Frequently Asked Questions
Do I need to install a driver for the AIR 192|4 on Windows?
Windows will run it with a generic class driver, but installing the official AIR Series driver gives you lower latency and access to the AIR Control Panel for sample rate and buffer settings.
Why does my AIR 192|4 disconnect randomly?
This is usually a USB power-management setting turning the port off to save energy, or an underpowered USB hub. Disable USB selective suspend and plug directly into the computer.
Can I use the AIR 192|4 on macOS?
Yes, M-Audio publishes a signed driver package for both Intel and Apple Silicon Macs on the same downloads page.
What sample rate should I record at?
48kHz/24-bit is a safe standard for most podcasting and music work. Only go to 96kHz if your specific project calls for it, since it uses more CPU and storage.
The gain knobs do not seem to change anything — why?
Confirm the correct input channel is selected in your DAW first. If the channel is right and gain still has no effect, try the manual reinstall steps above to rule out a corrupted driver.
Conclusion
Most AIR 192|4 problems trace back to either the generic Windows driver being used instead of the official AIR Series package, or a USB power-saving setting cutting the connection mid-session. Install the driver from M-Audio’s own site, disable USB selective suspend, and double-check your DAW’s input selection, and the interface should run reliably for a long time. If you still hit issues after all of this, a full driver removal and clean reinstall solves the vast majority of remaining cases.
Ryan is a Computer Science grad and long-time hands-on troubleshooter who writes for softwaredriverdownload.com, where he covers driver installs and fixes for audio, video, and PC peripherals. He has personally tested most of the setups on this site across a range of Windows machines.