If you just unboxed a Flysky transmitter and the little printed manual left you with more questions than answers, you are not alone. Flysky radios like the FS-i6X ship with a manual that covers the basics but skips a lot of the “why does my model do that” details. This guide walks through the general Flysky transmitter conventions that apply across most of their stick-type radios, using the FS-i6X as the reference model since it is one of the most common flagship units in Flysky’s lineup.
Key Specs
- Model referenced: FS-i6X (stick-type transmitter)
- Channels: 6 by default, expandable to 10 with a compatible receiver
- Protocol: AFHDS 2A (backward compatible with AFHDS)
- RF frequency: 2.408-2.475 GHz, 2.4GHz band
- Display: monochrome LCD with backlight
- Power input: 6V DC, 4x AA batteries
- Stick resolution: 4096
- Typical use: fixed-wing planes, helicopters, multirotors
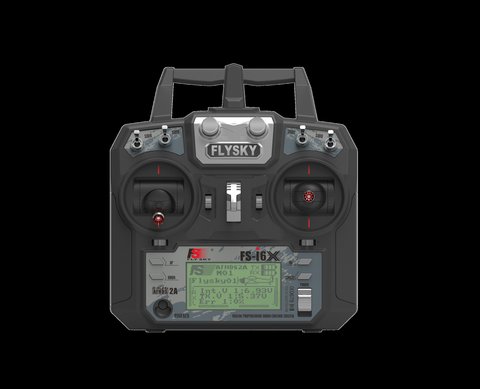
The first time I set up an FS-i6X for a small foam trainer plane, I made the classic beginner mistake of skipping the stick mode check. Flysky ships some units configured for Mode 2 (throttle on the left stick) and others for Mode 1, depending on the region and reseller. Before you bind anything, confirm which mode your sticks are wired for, because reversing that later means opening the case and moving the ratchet spring assembly, not just flipping a software setting.
Understanding the Transmitter Layout
Every Flysky stick transmitter follows a similar physical layout, even though exact switch placement differs between the i6, i6X, i6S, and newer i-series radios:
- Dual gimbal sticks for throttle, aileron, elevator, and rudder
- Two or more toggle switches (SWA, SWB, SWC, SWD) for flight modes, landing gear, or auxiliary channels
- A monochrome LCD screen showing model name, protocol, and voltage
- Up/Down/OK/Cancel buttons for menu navigation
- A bind key, usually on the front panel near the display
- A micro-USB or USB port for firmware updates and simulator connection
Binding the Transmitter to a Receiver
Binding is the process that pairs a specific receiver to a specific transmitter so no other radio can accidentally control your model. On most Flysky systems the steps are:
- Power off both transmitter and receiver
- Insert the bind plug into the receiver’s designated bind port (often labeled B/VCC/S)
- Power the receiver so its LED starts flashing rapidly
- Turn on the transmitter while holding the bind key, or enter the bind menu through the system settings
- Wait for the receiver LED to turn solid, confirming the bind succeeded
- Remove the bind plug and power cycle both units to test
Basic Model Setup Menu
Once bound, the model setup menu is where most of the day-to-day tuning happens. Common items you will see across Flysky transmitters include:
- Model Select – choose or create model memory slots
- Model Type – airplane, helicopter, or glider
- Sub Trim – fine center-point adjustment per channel
- Reverse – flip the direction a channel moves
- Travel Adjust (End Point) – limit servo throw
- Dual Rate/Expo – adjust stick sensitivity curves
- Failsafe – set what the model does if signal is lost
“I switched from a cheap toy-grade radio to an FS-i6X for my first real fixed-wing build, and the failsafe menu alone saved my plane after I flew it out past the treeline and briefly lost signal. It came back to idle throttle instead of diving into the ground.” – Marcus Webb, weekend flyer and RC forum moderator
Firmware and Calibration
Flysky periodically releases firmware updates for the i6-series transmitters through their official downloads page and the Flysky Assistant software. Updating typically involves connecting via USB, entering the firmware update mode from the system menu, and letting the assistant software push the new file. After any firmware update, always run stick calibration again since centering values can shift.
Common Setup Mistakes
- Forgetting to set failsafe before the first flight
- Mixing up channel order between the transmitter and the flight controller or ESC
- Not checking the AFHDS vs AFHDS 2A protocol setting when using an older receiver
- Leaving throttle stick in a non-zero position when powering on, which can trip safety warnings
- Ignoring the low voltage alarm threshold, which is adjustable in the system menu
Beyond the basics, most Flysky transmitters also support mixing functions for V-tail planes, flaperons, and elevons. These live under a “Mix” or “Advanced” submenu and let you combine two channels so a single stick movement drives two servos in a coordinated way. It sounds complicated on paper, but the menu walks you through source channel, destination channel, and mix percentage step by step.
One more thing worth mentioning: model memory. Every Flysky transmitter in this family stores multiple model profiles, so if you fly more than one aircraft you do not need to re-bind or re-tune each time. Give each model a distinct name in the setup menu, since the default “Model01” naming gets confusing fast once you have five or six saved. Copying settings between model slots is also supported, which is handy when two planes share nearly identical setups except for one channel reversal.
Frequently Asked Questions
Do all Flysky transmitters use the same manual?
No. While the menu structure is similar across the i6 family, exact wording and screen layouts differ between models and firmware versions. Always check the manual matching your exact model number.
Can I use a Flysky transmitter with a non-Flysky receiver?
Only if that receiver explicitly supports AFHDS or AFHDS 2A. Many flight controllers include compatible receiver modules, but always verify compatibility before binding.
Where do I download the official PDF manual?
Flysky’s official site hosts manuals for each model under its downloads section, and third-party manual archives such as ManualsLib also mirror most Flysky PDFs.
What should I do if the transmitter won’t bind?
Double check the bind plug is seated in the correct port, confirm both units are on the same protocol setting, and try re-flashing receiver firmware if binding still fails after a factory reset.
Conclusion
Learning the general conventions of a Flysky transmitter pays off no matter which specific model ends up in your hands, since the underlying menu logic barely changes across the lineup. Take the time to walk through binding, failsafe, and basic trim adjustments before your first flight, and keep the manual or a bookmarked PDF handy for reference until the menu structure becomes second nature.
Ryan has spent years testing consumer electronics and RC gear side by side, including a fair number of transmitters and receivers that ended up disassembled on his workbench. He writes at softwaredriverdownload.com.