The DDPAI N3 Pro (sometimes referred to as the “Mola N3 Pro” in some regional listings) is a 1600P dual-channel dash cam. Here’s a complete setup and manual walkthrough covering installation, app pairing, and common settings.
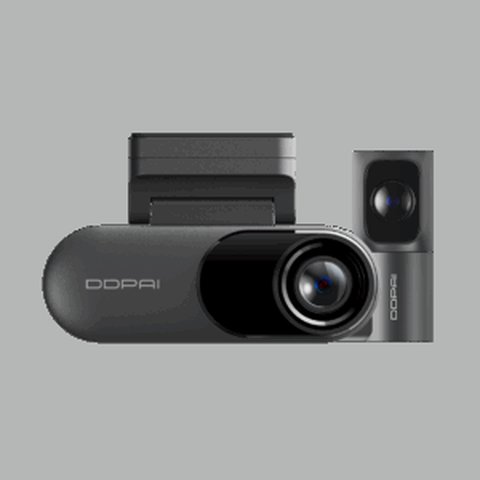
Key Specs
- 1600P front camera, 1080P rear camera with audio
- 140° front field of view, 125° rear, F1.8 aperture, 5-layer lens
- NightVIS 2.0 with WDR technology
- Built-in GPS and SR2.0 real-time driving data
- Supports microSD cards up to 512GB
- 2.4GHz WiFi with the DDPAI companion app
Installing the N3 Pro Step by Step
- Clean the windshield area behind the rearview mirror before mounting to ensure the adhesive bracket sticks properly
- Attach the front unit to the bracket and adjust the viewing angle before securing the cable
- Route the power cable along the A-pillar and headliner, tucking it into the trim gaps
- Run the rear camera cable along the opposite side of the headliner to the back window
- Insert a formatted microSD card before powering on the unit for the first time
- Connect the 12V car charger, or install a hardwire kit separately for parking mode support
Pairing the DDPAI App
Download the DDPAI app from your phone’s app store, then power on the N3 Pro and select “Connect Device” within the app. The camera broadcasts its own WiFi network with an SSID typically starting with “DDPAI”; connect your phone to that network directly, then return to the app to complete pairing. Once connected, you can preview live footage, adjust resolution and loop recording length, and download clips without removing the SD card.
If the app fails to detect the camera, restart both the camera and your phone’s WiFi connection, and confirm you haven’t accidentally connected to your home network instead of the camera’s direct broadcast.
Understanding the “Mola” Naming
Some regional retailers and import listings refer to this camera as the “Mola N3 Pro,” which appears to be a distributor or reseller naming variation rather than a distinct product line from DDPAI. The hardware and firmware are the same as the standard N3 Pro sold through DDPAI’s official channels, so manuals and firmware downloads for the N3 Pro apply regardless of which name appears on your specific packaging.
Format your microSD card through the DDPAI app rather than your computer before first use — dash cams write footage in a specific loop-recording file structure, and a card formatted the standard way on a PC can cause skipped or corrupted recordings until it’s reformatted correctly through the camera itself.
Common Setup Issues and Fixes
- If GPS won’t lock, ensure the camera has a clear view of the sky and allow a few minutes on first power-up
- If footage looks dim at night, confirm NightVIS 2.0 and WDR are both enabled in the app settings
- If parking mode doesn’t activate, verify your hardwire kit is properly connected to constant power and the ignition-sensing wire
For the official manual and firmware downloads, see DDPAI’s official N3 Pro product and manual page.
Adjusting Recording Settings for Your Driving Habits
Once the N3 Pro is installed and paired, it’s worth spending a few minutes in the app tuning settings to your actual driving pattern rather than leaving everything on default. If you mostly drive short local trips, shorter loop segments help you locate a specific incident faster during playback. If you do long highway drives, longer segments reduce the number of file breaks during a single continuous drive, making it easier to review one uninterrupted stretch of footage.
G-sensor sensitivity is another setting worth revisiting after a week of normal use — if you’re getting locked event files from routine potholes or speed bumps, dial the sensitivity down slightly so genuine impacts remain reliably flagged without filling up your protected file storage with false positives.
Maintaining the Camera Over Time
Beyond initial setup, a few minutes of periodic maintenance keeps the N3 Pro running reliably for years. Wipe the lens gently with a microfiber cloth every few weeks to prevent dust buildup from affecting image clarity, and reformat your microSD card through the app every couple of months to clear filesystem fragmentation that naturally builds up from constant loop recording write cycles.
Frequently Asked Questions
Is the Mola N3 Pro the same hardware as the standard N3 Pro?
Yes, based on available information it’s the same underlying DDPAI hardware sold under a different regional listing name.
How do I update the firmware?
Firmware updates are typically pushed through the DDPAI app; check the settings menu for an available update prompt.
Can I record without a microSD card installed?
No, the N3 Pro requires a microSD card for recording since it doesn’t include built-in storage.
Does the rear camera record audio?
Yes, the N3 Pro supports audio recording on its rear channel in addition to video.
Why does the app keep disconnecting from the camera?
This is often caused by phone WiFi power-saving settings; disable battery optimization for the DDPAI app or your phone’s WiFi adapter.
What’s the maximum recommended card speed class?
A Class 10 or UHS-1 rated card is generally recommended to keep up with continuous dual-channel loop recording without dropped frames.
Can I set a custom loop recording segment length?
Yes, the DDPAI app typically lets you choose between 1, 2, or 3-minute loop segments depending on your preference.
Does the N3 Pro support multiple user accounts on the app?
The app generally supports connecting from multiple devices, though only one active live-view connection is typical at a time.
Can I disable the front display to save power?
Check the app settings for a screen timeout or auto-off option, which is common on cameras with a built-in display.
Conclusion
The N3 Pro’s setup process is fairly standard for a dual-channel dash cam, and most issues trace back to card formatting or app pairing rather than hardware problems. Follow the steps above and you should have it recording reliably within about 20 minutes of unboxing.
Ryan holds a Computer Science degree and has over 20 years of hands-on experience with PC hardware, software, and smart home devices.