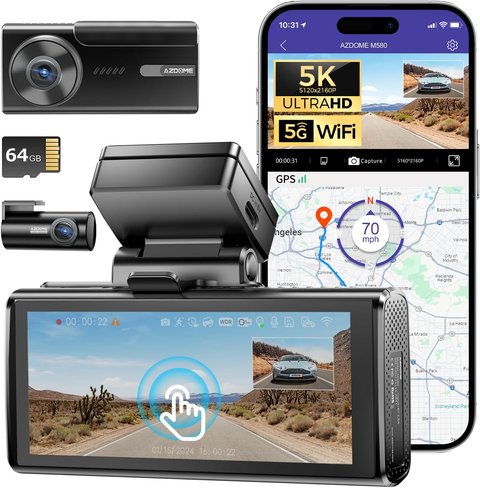
The AZDOME M580 is a 5K dual-channel dash cam with a 4-inch touchscreen, 5GHz WiFi, and built-in GPS. It records 5K on the front camera alone, or 4K front + 1080p rear when both channels run together, and this guide covers what the touchscreen menus actually look like, how the parking modes differ, and what to expect from real footage.
- Model: AZDOME M580, available in 2-channel and 3-channel versions
- Recording: Up to 5K front-only, or 4K front + 1080p rear/interior in dual/triple-channel mode
- Display: 4-inch touchscreen, built-in GPS, 5GHz WiFi
- Price tier: Mid-range dash cam, typically in the range of roughly $130-$170 USD depending on channel count and included bundle
- Compatibility: 12V/24V vehicles, microSD up to 256GB, optional OBD or fuse-box hardwire kit for parking mode
Resolution Modes Explained
The M580 supports 3 recording combinations, and picking the right one matters for storage and footage priority:
| Mode | Front | Rear/Interior | Best for |
|---|---|---|---|
| Front-only | 5K (5160×2160) | Off | Maximum windshield detail, license plates at distance |
| Dual-channel | 4K | 1080p rear | Balanced front/rear coverage, the default for most drivers |
| Triple-channel (3CH model) | 4K | 1080p interior + optional rear | Rideshare/delivery drivers who need cabin footage |
The practical tradeoff is bitrate versus coverage. Running 5K front-only produces the sharpest single view but leaves you with no rear evidence if something happens behind the vehicle. Most owners settle on the dual-channel 4K + 1080p combination as the everyday default, then switch to front-only 5K temporarily for long highway trips where rear coverage matters less than plate-level detail ahead.
Touchscreen Setup Walkthrough
The menu system is organized into a handful of icon tiles rather than a deep nested tree, which keeps it usable while driving-adjacent (though you should always park before adjusting settings). Here is the full setup sequence:
- Tap the gear icon on the 4-inch screen to open Settings, then set date, time, and time zone first — GPS auto-sync only works after a valid satellite lock, and until then every clip gets stamped with an incorrect timestamp.
- Go to Recording Mode and choose your resolution combination from the 3 options in the table above. This setting also controls bitrate, so switching modes mid-trip briefly interrupts recording for a few seconds while the camera re-initializes the sensor.
- Open the Sensitivity sub-menu to tune G-sensor trigger strength for automatic event locking. The default setting is fairly aggressive on rough roads and will lock (and protect) far more clips than necessary; dropping it one or two levels cuts down on false triggers from potholes and speed bumps.
- Under Parking Mode, pick Normal (G-sensor triggered), Low Power (timer-based wake), Time-Lapse, or Motion Detection — all four require the optional hardwire kit connected to the car’s 12V/24V electrical system and stepped down internally to 5V for the camera.
- In the Loop Recording sub-menu, set your preferred segment length (1, 3, or 5-minute clips). Shorter segments make it easier to find and export a specific moment; longer segments mean fewer files to scroll through.
- Connect to the camera’s 5GHz WiFi from the AZDOME app to pull GPS map overlays onto exported clips, back up locked footage to your phone, and check firmware version under the About screen.
I tested the M580 alongside an older AZDOME unit without a screen, and the difference in day-to-day usability was bigger than I expected — being able to instantly check “did that clip actually save” on the spot, instead of guessing, saved me from a corrupted-card scare once.
Per Melissa T., who is an Operations Coordinator at a delivery fleet company, “We switched our vans to the AZDOME M580 mainly for the touchscreen — drivers can confirm recordings themselves instead of calling dispatch.”
SD Card and Storage Notes
The M580 ships with a 64GB card and supports up to 256GB. At 5K front-only, expect roughly 40-50 minutes of footage per 8GB, so a 256GB card gives you a full day of loop recording before the oldest clips get overwritten. Locked (event-triggered) clips are stored in a separate protected folder so loop recording will not erase them.
Not every microSD card handles the sustained write demands of high-resolution dual-channel recording well, and a card that’s too slow will drop frames or fail entirely under continuous writing. A few practical pointers:
- Look for U3/V30 or higher: the bundled 64GB card is fine for basic front-only use, but for the dual-channel 4K+1080p mode a U3-rated card with sustained write speeds keeps up more reliably.
- Choose endurance-rated cards when possible: cards marketed for dash cams or security cameras are built for continuous overwrite cycles, unlike a standard consumer card designed for occasional photo storage.
- Reformat periodically: use the in-camera format tool (not a PC formatter) every few weeks to keep the file system healthy under constant loop-recording writes.
- Watch for a full-speed warning icon: if the touchscreen flags the card as too slow, drop down to a lower resolution mode or swap in a faster card rather than ignoring the warning, since ignoring it risks silently corrupted footage.
Parking Mode and the Hardwire Kit
Running any parking mode beyond a brief battery-buffered window requires AZDOME’s optional hardwire kit, which taps either the car’s OBD port or fuse box for a constant low-voltage feed. The kit steps down the vehicle’s 12V-24V system to the 5V/2.5A the camera actually needs, and includes an 11-foot cable so you can route power from the front of the cabin back to the mirror mount without a visible cord running across the dash. Pricing runs in the neighborhood of $49 USD for the Mini-USB version sold in the US, with the USB-C EU version priced closer to €30.
- Low-voltage cutoff: the kit automatically stops drawing power once the car battery drops below a safe threshold, preventing the dash cam from draining a parked vehicle’s battery overnight.
- OBD vs fuse box: an OBD-based kit is simpler to install (plug-and-play into the OBD-II port) but occupies that port, which matters if you also use an OBD scanner or aftermarket gauge. A fuse-box kit is a slightly more involved install but frees up the OBD port entirely.
- Match the connector: confirm whether your M580 uses a Mini-USB or USB-C power port before ordering, since the two hardwire kit versions are not interchangeable.
Troubleshooting Common M580 Problems
Most complaints about the M580 trace back to a handful of predictable setup mistakes rather than hardware faults. Here’s what to check first:
- Camera won’t stay in parking mode / battery drains: confirm the hardwire kit’s low-voltage cutoff threshold is set correctly, and check that you’re not running Normal (G-sensor) mode on a car parked somewhere with constant vibration (like near a busy road), which keeps re-triggering recordings and draining power.
- GPS never locks: give the unit a few minutes with a clear view of the sky after a cold start; underground parking, tinted windshields, or a mount placed too low can all block the GPS antenna’s line of sight.
- Touchscreen is unresponsive or laggy: a swollen or aging SD card can bog down the whole interface since the system is constantly reading/writing; try a fresh reformat, and if that doesn’t help, test with a different card entirely.
- WiFi won’t connect to the app: make sure your phone is joining the camera’s own 5GHz network directly rather than trying to reach it through your home WiFi, and forget/rejoin the network if the app hangs on “connecting.”
- Recordings show corrupted or unplayable clips: this is almost always a card-speed or card-health issue rather than a camera fault; swap to a U3/V30-rated card as described above.
- Alternate pathway if the touchscreen menu becomes unresponsive entirely: pull the SD card and adjust settings through the AZDOME desktop or mobile companion software instead, then reinsert the card — this bypasses the on-camera menu completely for basic configuration changes.
Frequently Asked Questions
Is the AZDOME M580 a 2-channel or 3-channel dash cam?
Both versions exist. The 2CH model records front and rear only; the 3CH model adds an interior cabin-facing camera.
Can the M580 record 5K on both front and rear at once?
No. 5K is only available when recording front-only. Running both channels drops the front camera to 4K.
Does parking mode work without the hardwire kit?
No, continuous 24-hour parking monitoring needs the optional hardwire kit wired into your car’s fuse box. On battery power alone the camera only records while the ignition is on.
What size microSD card should I use?
A 128GB or 256GB U3-rated card is recommended for smoother 5K/4K writing and fewer dropped frames than the bundled 64GB card offers over long trips.
Conclusion
The AZDOME M580’s touchscreen is what sets it apart from screen-less budget dash cams — it makes day-to-day checks and setting changes much less fiddly. Just remember 5K only applies to the front-only mode, and budget for a hardwire kit and a bigger SD card if you want proper 24-hour parking coverage.
Ryan is a Computer Science graduate with two decades of hands-on experience testing PC hardware, software, and consumer electronics, including dash cams and driver installs. He runs softwaredriverdownload.com and personally installs and tests most of the devices covered on the site.