The Brother QL-820NWB is a network label printer with Wi-Fi, Ethernet, and Bluetooth built in, which makes setup slightly more involved than a plug-and-play USB label printer. Getting the driver and P-touch Editor installed correctly the first time saves you from chasing connection errors later.
I set this printer up for a small retail counter that needed fast visitor and shipping labels, and the trickiest part was not the driver itself — it was making sure the printer joined the same Wi-Fi network as the PC before running the installer. Once that was sorted, printing worked immediately.
Quick Spec Reference
| Field | Detail |
|---|---|
| Applies To | Brother QL-820NWB / QL-820NWBc label printer |
| Publisher | Brother Industries, Ltd. |
| Driver Package | Printer Driver + P-touch Editor + Printer Setting Tool |
| Version | Check Brother’s downloads page for the current release; drivers are updated periodically |
| File Size | Approximately 60–100 MB for the full software bundle |
| Requirements | Windows 11, Windows 10, Windows 8.1 (32/64-bit); USB, Wi-Fi, Ethernet, or Bluetooth connection |
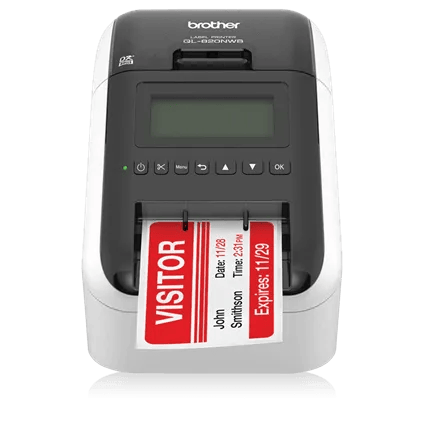
Downloading the Brother QL-820NWB Driver
Brother’s support site organizes downloads by exact model, and the QL-820NWB and QL-820NWBc pages are separate even though the hardware looks nearly identical, so double-check you picked the right one.
- Go to the official Brother QL-820NWB downloads page.
- Select your Windows version and choose the Full Driver & Software Package rather than a driver-only download.
- Run the installer and choose your connection type when prompted — USB, wireless, wired network, or Bluetooth.
- For wireless setup, use the printer’s LCD menu to join your Wi-Fi network before the installer tries to find it.
- Finish the wizard and print a test label to confirm the connection.
The Full Driver & Software Package includes P-touch Editor, which is the label design app most QL-series owners actually use day to day, plus the Printer Setting Tool for adjusting network and print-quality options.
Manual Driver Install via Device Manager
For a USB-connected QL-820NWB, you can install the driver manually if the full installer will not complete.
- Download and extract the driver package instead of running the installer directly.
- Connect the printer via USB and power it on.
- Open Device Manager, find the QL-820NWB (often under “Other devices” or “Printers”), right-click it, and choose Update driver.
- Select Browse my computer for drivers and point to the extracted folder.
Fixing Common Brother QL-820NWB Problems
Printer Not Found During Wireless Setup
- Confirm the printer and PC are on the exact same Wi-Fi network — a phone hotspot or guest network will not work.
- Check the printer’s LCD screen for its assigned IP address and make sure it is not showing 0.0.0.0, which means it failed to get an address from the router.
- Temporarily disable VPN software on the PC during setup, since some VPNs block local network discovery.
Labels Print Blank or Cut Off
- Open the Printer Setting Tool and confirm the correct label size (DK roll) is selected to match what is loaded.
- Reseat the DK roll — it needs to click firmly into place or the sensor will misread the label length.
- Run the built-in cleaning function from the driver’s printer properties if print quality looks faded rather than blank.
Bluetooth Pairing Fails
- Make sure Bluetooth is enabled on both the PC and the printer — press and hold the printer’s Bluetooth button until the LED lights up.
- Remove any previous pairing entry for the printer in Windows Bluetooth settings before pairing again.
- Bluetooth on this model is meant mainly for mobile printing via the Brother iPrint&Label app; for a desktop PC, USB or Wi-Fi is generally more reliable.
Per Priya S., who is a Warehouse Supervisor at a fulfillment company, “We run several QL-820NWB units on the network setting and once they’re joined to Wi-Fi, they’re rock solid — the only hiccup is always during that first pairing step.”
Reinstalling After a Failed Install
- Uninstall the existing Brother driver and P-touch Editor from Settings > Apps.
- Restart the computer.
- Power-cycle the printer — turn it off, wait 10 seconds, then turn it back on.
- Reinstall using a freshly downloaded copy of the Full Driver & Software Package.
Choosing the Right Label Roll
The QL-820NWB accepts Brother’s DK-series continuous and die-cut rolls, and picking the wrong one is a common reason labels look misaligned even when the driver is set up correctly.
| Roll Type | Best Use | Notes |
|---|---|---|
| DK-2205 Continuous | Long labels, custom lengths | Cut length is controlled from the driver or P-touch Editor |
| DK-1201 Die-Cut Address | Standard address labels | Fixed length, automatic label-end detection |
| DK-2251 Black/Red | Two-color labels | Requires the QL-820NWBc for red printing support |
Frequently Asked Questions
Which download should I choose for the QL-820NWB?
Choose the Full Driver & Software Package rather than a driver-only file — it includes P-touch Editor and the Printer Setting Tool, both of which most users need.
Can I use the QL-820NWB over USB and Wi-Fi at the same time?
Yes, but you will need to add the printer twice in Windows (once per connection type) since each connection is treated as a separate printer instance.
Why does my printer show as offline in Windows?
This usually means the IP address changed after a router restart. Reassign a static IP for the printer in your router settings, or rerun the wireless setup wizard.
Does the QL-820NWB work with Mac and Linux too?
Yes, Brother provides separate driver packages for Mac and Linux on the same downloads page.
What is the difference between the QL-820NWB and QL-820NWBc?
The QL-820NWBc adds support for two-color (black and red) printing on compatible DK-2251 label rolls, while the standard QL-820NWB prints black only.
Conclusion
The Brother QL-820NWB is straightforward to set up once the printer is actually joined to your network before you run the installer — that single ordering detail is behind most of the “printer not found” problems people run into.
If wireless setup keeps failing, falling back to a direct USB connection for the initial driver install, then switching to Wi-Fi afterward through the Printer Setting Tool, is a reliable workaround.
Ryan is a self-taught driver and hardware specialist with 15 years of experience diagnosing PC, printer, and peripheral problems. He publishes his findings on softwaredriverdownload.com to help readers fix the same issues faster.