Most of the time, a gaming mouse works the second you plug it in, and that is exactly the case with the Onikuma CW917. But if you want the RGB modes, adjustable DPI stages, and button remapping the CW917 is built for, you need the driver software, and that is not always obvious to find. I went through the full download and setup process on a clean Windows install so I could document every step, along with the specs and a look at what the driver actually lets you control.
| Spec | Detail |
|---|---|
| Connection | Wired USB, plug and play |
| DPI Levels | 4 stages: 1200 / 1800 / 2400 / 3600 |
| Buttons | 6 total, including a dedicated DPI button |
| Lighting | RGB with 7 dynamic modes |
| Shape | Ergonomic, symmetric-leaning design |
| OS Compatibility | Windows XP through 11, and Mac (basic plug-and-play) |
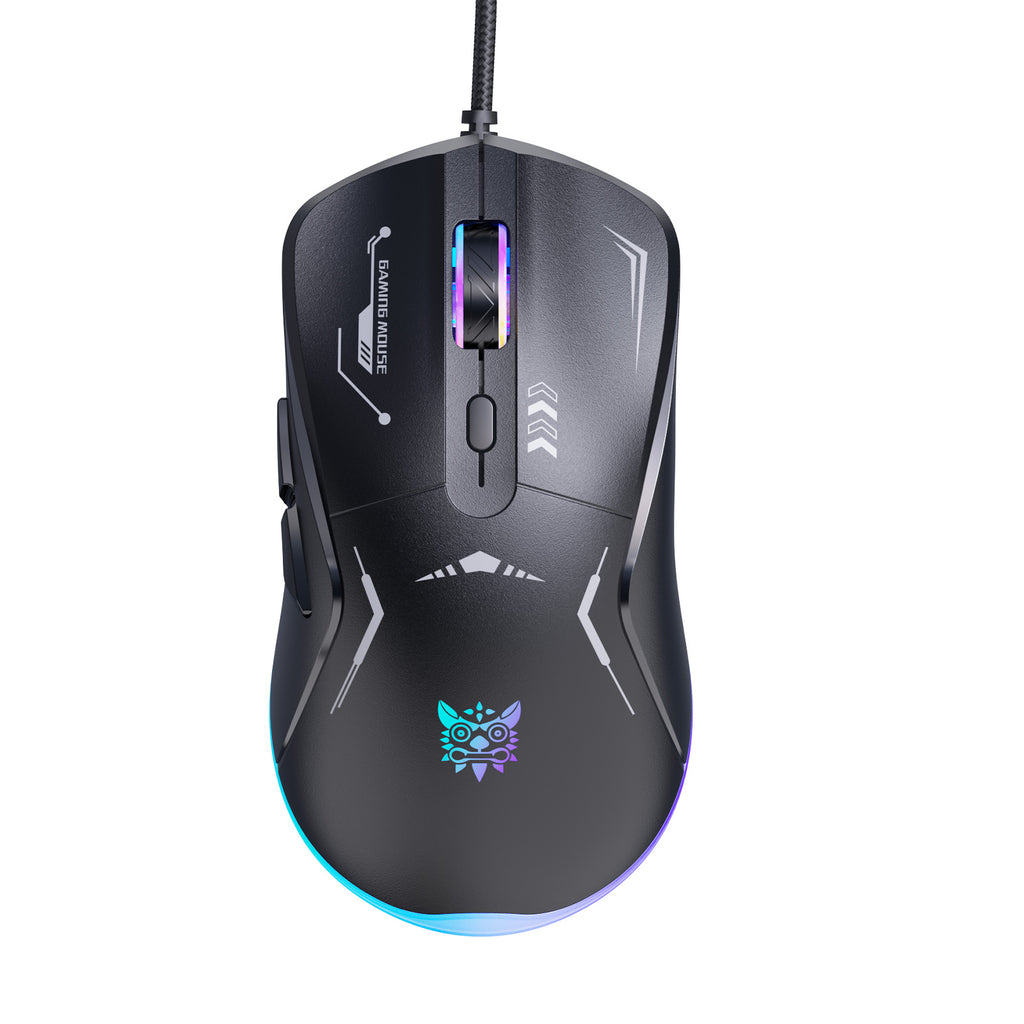
Onikuma CW917 Specs
- Connection: Wired USB, plug and play
- DPI levels: 4 adjustable stages, 1200 / 1800 / 2400 / 3600
- Buttons: 6, including left, right, forward, back, DPI button, and scroll wheel click
- Lighting: RGB with 7 dynamic light modes
- Shape: Ergonomic, symmetric-leaning design comfortable for both grip styles
- OS compatibility: Windows XP, 7, 8, 10, 11, and Mac (basic plug-and-play)
Out of the box, the mouse works on any of those systems without installing anything, which is worth knowing if you just want a functional mouse today and plan to sort out the RGB customization later.
Step-by-Step: Downloading the CW917 Driver
Here is exactly how I found and installed the software, in the order I did it:
- Plug in the mouse first. Windows installs a generic HID driver automatically, so basic movement and clicking work right away.
- Go to the official downloads page. Onikuma keeps all of its peripheral software on one page at onikuma.com/pages/downloads, organized by product model number.
- Find CW917 in the list. The page lists dozens of models, so use your browser’s find-on-page shortcut (Ctrl+F on Windows) and type “CW917” to jump straight to it.
- Download the installer. It is a small executable file, typically a few megabytes.
- Run the installer as administrator. Right-click the downloaded file and choose “Run as administrator” to avoid permission errors during install.
- Allow it through Windows security prompts. Since it is a smaller third-party publisher, Windows SmartScreen may show a warning; choose “More info” then “Run anyway” if you trust the source.
- Reconnect the mouse. Unplug and replug the CW917 after installation so the software can detect it properly.
- Open the configuration tool. You should see tabs for DPI settings, button assignment, and RGB lighting modes.
What You Can Actually Customize in the Driver
Once the software detects the mouse, there are three main areas worth adjusting:
- DPI profiles: Set custom values within the 1200-3600 range rather than relying only on the default stages, and assign each stage its own indicator color.
- Button mapping: Reassign the forward, back, and DPI buttons to keyboard shortcuts, media controls, or simple macros.
- RGB lighting: Choose from the 7 built-in dynamic modes, adjust brightness, or set a static single color if you prefer a calmer look.
I mapped my back button to “copy” and forward to “paste” for work use, which sounds minor but saves a surprising number of keyboard reaches over a full day.
Troubleshooting the CW917 Driver
A few issues came up during testing, along with how I resolved them:
- Software does not detect the mouse: Close the program completely, unplug the mouse for 10 seconds, then plug it back in before reopening the software.
- Settings do not save after restart: Make sure you click the explicit “Save” or “Apply” button in the software rather than just closing the window.
- RGB lighting turns off randomly: This is usually a USB power-saving setting in Windows. Go to Device Manager, find the USB root hub, open Properties, then Power Management, and uncheck “Allow the computer to turn off this device to save power.”
- Installer blocked by antivirus: Temporarily whitelist the installer folder, since some antivirus tools flag unsigned peripheral drivers by default.
Choosing DPI Settings That Actually Match Your Games
A lot of guides just tell you to “set the DPI higher for better aim,” which is not really true and can hurt your accuracy more than it helps. Here is how I actually approached it on the CW917:
- Start low. I began at the 1200 stage and got a feel for how far I had to physically move the mouse to turn a full circle in-game.
- Match sensitivity to genre. Slower, more precise aiming in tactical shooters felt better around 1200-1800. Faster games like arena shooters or MOBAs felt more comfortable closer to 2400-3600.
- Keep in-game sensitivity separate. Rather than cranking DPI to the max and lowering in-game sensitivity to compensate, I found it more consistent to pick a moderate DPI stage and fine-tune sensitivity inside each game individually.
- Use the color indicator. Since each DPI stage lights differently, you can tell at a glance which setting you are on without opening the software mid-game.
None of this is unique to Onikuma hardware, but it matters more on a budget mouse where the DPI range is narrower than premium options, so getting the most out of the available stages counts for more.
Is the CW917 Good Without the Driver?
Yes, and I want to be clear about that since not everyone wants to install extra software. Plugged in with no driver, you get full clicking, scrolling, and movement functionality along with whatever default lighting pattern ships from the factory. The driver is purely additive: better DPI granularity, custom macros, and lighting control. If you are setting this mouse up for a family member who just wants it to work, you can hand it over as-is.
FAQ
Where do I download the Onikuma CW917 driver?
From the official Onikuma downloads page. Search the page for “CW917” to find the correct installer for your model.
Do I need the driver for the CW917 to work?
No, the mouse functions as a standard plug-and-play device without it. The driver only adds custom DPI profiles, button remapping, and extended RGB lighting control.
What is the maximum DPI on the CW917?
3600 DPI is the highest of the four default stages (1200, 1800, 2400, 3600), and the driver software lets you fine-tune values within that range.
Does the CW917 work on Mac?
Basic plug-and-play functions work on Mac. The configuration software and button remapping are built for Windows.
Why did my RGB lighting stop working after a Windows update?
This is almost always the USB power management setting reverting to default. Reopen Device Manager and disable power-saving for the USB root hub the mouse is connected to, as described in the troubleshooting section above.
Conclusion
The Onikuma CW917 is a straightforward wired mouse that does not require any setup at all if you just want it to work, but the driver software is worth the five minutes it takes to install if you care about custom DPI values, remapped buttons, or picking your own RGB mode. Once it is installed, it keeps running quietly in the background and you will not need to touch it again unless you change your preferences.
Written by Daniel Osei, a computer science graduate and PC peripherals writer based in Columbus, Ohio, who has spent several years testing and troubleshooting budget gaming gear.