The DDPAI X2S Pro is a dual-channel dash cam with a QHD 2K front camera and 1080P rear coverage. Here’s a complete setup and manual walkthrough covering installation, app pairing, and common configuration steps.
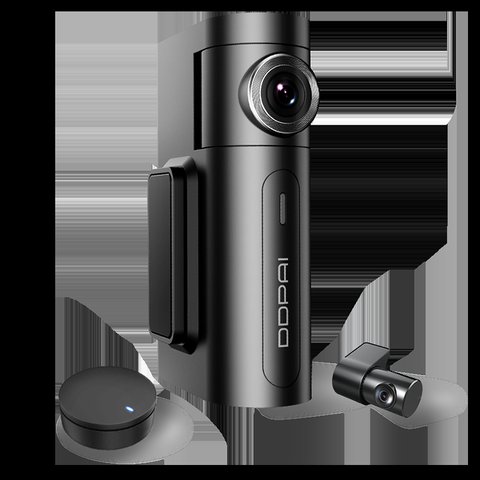
Key Specs
- Front: 4MP CMOS sensor, 2560×1440 QHD, 140° view, F1.8 lens
- Rear: 1080P, 125° view, F2.0 lens
- Built-in 2.4GHz WiFi, GPS module, 3-axis G-sensor
- Supports Class 10 microSD cards up to 128GB
- 1GB RAM for smooth loop recording processing
Installing the X2S Pro Step by Step
- Clean the windshield mounting area behind the rearview mirror before attaching the bracket
- Attach the front unit and adjust the angle to center the road in frame before securing the cable
- Route the power cable along the A-pillar and headliner, tucking it into interior trim gaps
- Run the rear camera cable along the opposite headliner side to the back window
- Insert a Class 10 microSD card (up to 128GB) formatted through the camera before first use
- Connect the 12V car charger, or install a hardwire kit separately for parking mode
Connecting to the DDPAI App
Power on the X2S Pro and locate its default WiFi network, which broadcasts as “DDPAI_X2S Pro_XXXX” with the default password “1234567890.” Connect your phone directly to this network, then open the DDPAI app and select “Connect Device” to complete pairing. Once paired, you can view live footage, adjust video quality settings, and download clips directly to your phone without removing the SD card.
It’s worth changing the default WiFi password after initial setup if privacy is a concern, since the default credentials are publicly documented and could theoretically let someone nearby connect to your camera’s local network.
GPS Setup and First-Time Calibration
The built-in GPS module needs a clear view of open sky to lock position accurately, so expect the first few minutes after installation to show inconsistent or missing location data while it acquires signal. Once locked, GPS data logs alongside your video for route, speed, and timestamp information, which is useful for insurance disputes or simply reviewing your own driving history.
Format your microSD card through the DDPAI app rather than your computer — dash cams use a specific loop-recording file structure, and a standard PC-formatted card can lead to skipped or corrupted recordings until reformatted correctly through the camera itself.
Common Setup Issues and Fixes
- If the app can’t find the camera, confirm your phone is connected to the camera’s direct WiFi network, not your home network
- If footage skips or stutters, check that your SD card meets the Class 10 speed requirement
- If GPS never locks, reposition the camera or check for obstructions like tinted windshield strips blocking satellite signal
For the official manual and firmware, see DDPAI’s official X2S Pro manual page.
Adjusting ADAS and Recording Settings
Once the X2S Pro is installed and paired, spend a few minutes reviewing the ADAS sensitivity and loop recording length settings in the app rather than leaving everything on default. Lane departure alerts in particular are worth calibrating to your specific vehicle’s mounting angle, since a poorly calibrated setting tends to either miss real departures or trigger constant false alerts that eventually get ignored entirely.
Frequently Asked Questions
Can I use a card larger than 128GB?
No, 128GB is the stated maximum supported card size for this model; a larger card may not be recognized correctly.
How do I change the default WiFi password?
This is typically done through the network settings section within the DDPAI app after initial pairing.
Does the X2S Pro require a hardwire kit for basic use?
No, it works fine on standard 12V power for regular driving; a hardwire kit is only needed for extended parking mode recording.
Can I record without the rear camera connected?
Yes, the front camera can operate independently, though you’ll lose rear channel coverage entirely.
Why does my footage look dim in tunnels?
Rapid lighting transitions can briefly affect exposure adjustment; this typically resolves within a second or two as the sensor recalibrates.
Does the app work on both iOS and Android?
Yes, the DDPAI app is available for both platforms with similar core functionality.
Can I set custom G-sensor sensitivity levels?
Yes, sensitivity is typically adjustable in multiple steps through the app’s device settings menu.
Does the X2S Pro support 4G connectivity like newer models?
No, cellular connectivity is exclusive to newer DDPAI models like the Z50 Pro and Z60 Pro.
Does the X2S Pro support loop recording length customization?
Yes, loop segment length is typically adjustable within the app’s recording settings.
Can two phones connect to the camera’s WiFi at once?
Typically only one active connection is supported at a time for live preview and settings access.
Is a car charger included with the X2S Pro?
Yes, a standard 12V car charger is included as part of the base package.
When to Consider Replacing Rather Than Troubleshooting
The X2S Pro is an older model in DDPAI’s lineup, so if you’re running into persistent hardware issues beyond basic setup problems — like a failing screen, unreliable G-sensor triggers, or a camera that won’t hold firmware updates — it’s worth weighing repair or replacement against simply upgrading to a newer model with better long-term support. Older hardware eventually reaches a point where troubleshooting time costs more than the value of keeping the original unit running.
Keeping Records of Your Configuration
Once you’ve dialed in your preferred settings — resolution, loop length, G-sensor sensitivity, ADAS thresholds — it’s worth jotting down your configuration somewhere, since a factory reset or troubleshooting step might require reconfiguring from scratch. This small habit saves real time if you ever need to reset the camera or set up a replacement unit with the same preferences.
Conclusion
The X2S Pro’s setup process follows the standard dual-channel dash cam pattern, and most first-time issues trace back to card formatting or WiFi pairing rather than actual hardware faults. Follow the steps above and you should have reliable recording within about 20 to 30 minutes.
Ryan
CS graduate · tests every camera and driver he writes about firsthand